Do you want to try playing around with Raspberry Pi? Maybe you have encountered several problems such as no monitor to configure Raspberry Pi, no keyboard to write the commands, or no LAN cable. Maybe you have the same problem as mine, owning Raspberry Pi Zero W which can only be accessed through Wireless, USB using micro USB, or mini HDMI. If you have Raspberry Pi Zero and want to start playing around with Raspberry, please read this guide to start installing your Raspberry Pi!

Instalasi Operating System Raspbian Stretch Lite
Several things you need to start are as followed:
- Raspberry Pi Zero Wireless (make sure it’s not a Raspberry Pi without WiFi)
- Micro SD Card (Class 10 is better so the Read/Write Disk operations are better)
- 2A Handphone Charger
- Laptop with SD Card Reader (Micro-SD Adapter, if necessary)
- Wireless Router or Mobile WiFi Hotspot
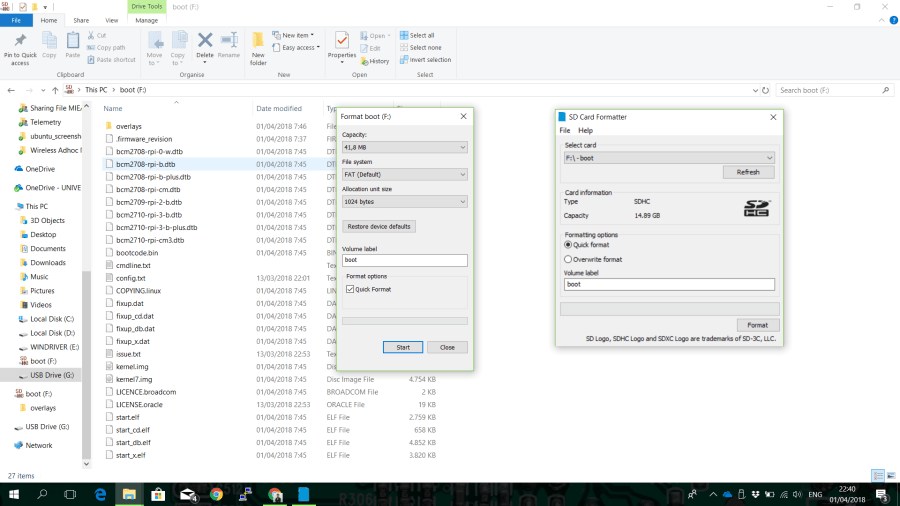
The first thing you need to do is to put in your SD Card into your computer, then format it if you have installed Raspbian on that SD Card. You can format it using SD Card Formatter (sdcard.org).
For a comparison, Picture 2 shows the formatting using quick format Windows dan SD Card Formatter. Windows Formatter can only format the F:\ partition in SD Card, while SD Card Formatter can format all of SD Card.
After doing Quick Format using SD Card Formatter, you can add Raspbian OS in SD Card. First thing you need to do is to download ZIP File from Raspbian OS Stretch Lite. Download from the Raspberry Pi official website for Raspbian Stretch Lite, with kernel Linux 4.9. There are two variants of Raspbian Stretch, which are the Desktop and Lite variants. Lite is the version without GUI, while the Desktop one had GUI so it can be connected to a monitor and keyboard and used like a normal computer.
After you have Raspbian Stretch Lite and a formatted SD Card, the next process is to flash Raspbian Stretch Lite on SD Card Formatter. My most favorable method is by using the Etcher program. This program can be downloaded from Etcher.io and it’s easy to use

Picture 3. Choosing Raspbian Stretch Lite to flash on SD Card using Etcher program
SSH Server dan WiFi Setup
To access Raspberry Pi without monitor or keyboard, you need an SSH Server and a WiFi connection. On the computer you’re using to configure Raspberry Pi, make sure you have an SSH client so you can use PuTTY.
To turn on SSH, you need to create an “ssh” file on the boot partition in SD Card that you flashed using Raspbian OS. Make sure you made the ssh file without any extension (not even .txt). It didn’t need to contain anything, just ensure that there is a file named “ssh”
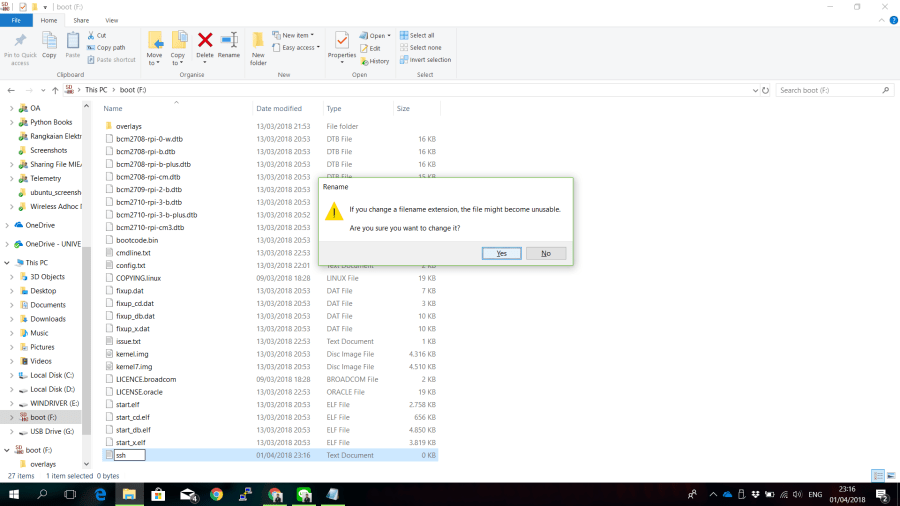
Picture 4. Installing SSH Server using SSH file without any extension in the SD Card for Raspbian
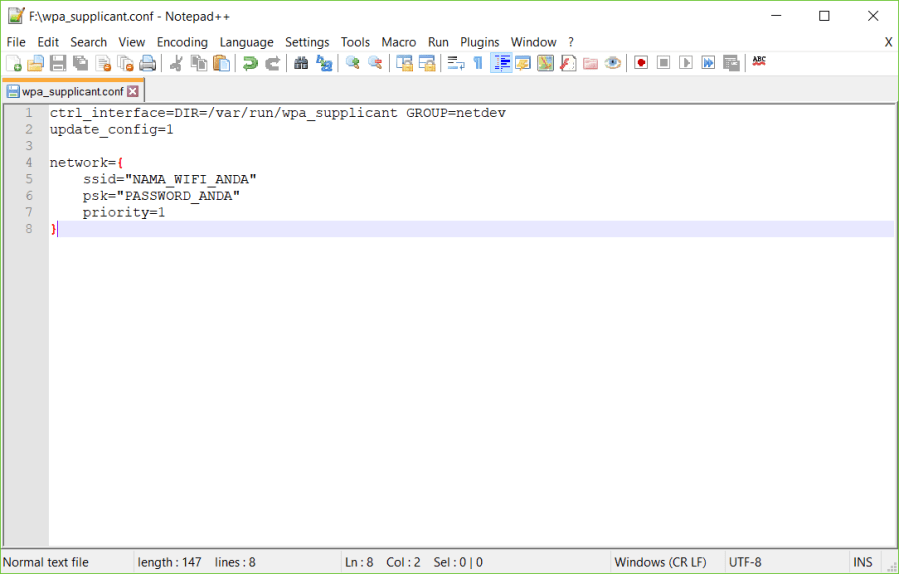
After adding the SSH server, the second thing you need to do is to create a “wpa_supplicant.conf” file on the boot partition. The content of this file is as follows:
ctrl_interface=DIR=/var/run/wpa_supplicant GROUP=netdev
update_config=1

network={
    ssid="NAMA_WIFI_ANDA"
    psk="PASSWORD_ANDA"
    priority=1
}
Use Notepad to write those, and make sure you saved it as “wpa_supplicant.conf”, not in .txt extension. Picture 5 shows the result of creating “wpa_supplicant” file which is placed in the boot partition (F:\). Change NAMA_WIFI_ANDA with the SSID your WiFi is using, and PASSWORD_ANDA according to the WiFi password.
After installing the Raspbian OS and adding the necessary files according to the instructions above, eject the SD Card and plug it into Raspberry Pi Zero.
Accessing SSH Raspberry Pi from PC
After ensuring that the created files are according to this tutorial, turn on Raspberry Pi Zero for the first time using the SD Card which had been installed with Raspbian OS and configured to be accessed using SSH through WiFi. Check the IP Address of your Raspberry Pi to access it using Raspberry Pi. You can use your Router’s DHCP Table to know which IP address is your Raspberry Pi’s. An example of that is shown in picture 6.

After that, you can open PuTTY to access SSH from Raspberry Pi with the IP Address you obtained through your DHCP Router. You can login using
login as: pi
pi@192.168.0.7's password: raspberry
Make sure you follow the instructions above, using “pi” as your login name and “raspberry” for your password. After that, you can access Raspberry Pi Zero through SSH to change your password. You can do that using the command:
$ passwd
You’ll be asked to fill the old password (raspberry) and fill in the new one. After you filled it, make sure the SSH Server from Raspberry Pi is turned on permanently. You can do that by using this command as root (sudo):
# raspi-config
By accessing raspi-config, you’ll be shown the interface below like in Picture 7 on your PuTTY window screen. Direct the pointer to the “Interfacing Options” and press Enter.

After accessing Interfacing Options, choose P2 SSH to access SSH Server configuration. You’ll be asked “Would you like the SSH server to be enabled?” Choose Yes and press Enter. You’ll then see “The SSH server is enabled”. After you’re redirected to the front page, press Finish to exit. You’ll be able to access Raspberry Pi via SSH without using Monitor or Keyboard after this, but ensure that you have WiFi with the same SSID and Password as the configuration you had done
Still have more questions? Please ask in this blog post. Good luck experimenting with your Raspberry Pi.
